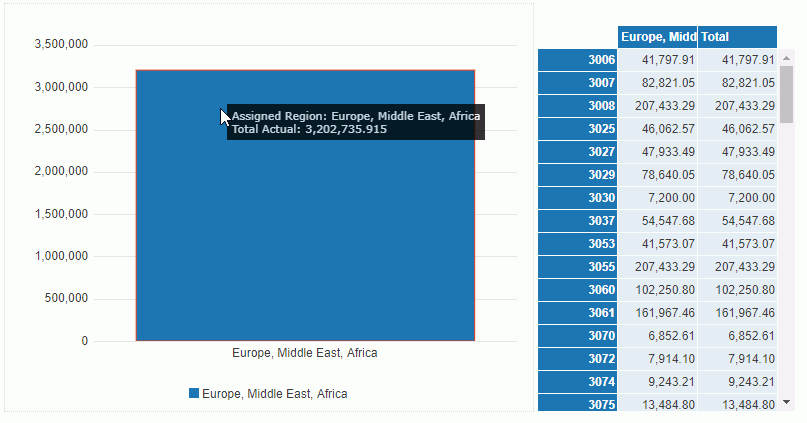
A message is a carrier of information that can be delivered between library components. It makes the runtime data synchronization possible. For example, you have two library components containing a crosstab and a table respectively, and both have the field Country. When you click any of the Country value in the crosstab at runtime, you want the crosstab and table to be filtered to show data of this country only. To achieve such synchronization, you can send out a filter message from the Country field in the crosstab and make the crosstab itself and the table receive the same message.
Messages can also be defined at runtime in JDashboard. For details see Synchronizing Data Components in the JReport Server User's Guide.
Message types
The messages that can be delivered between library components include the built-in messages Filter, Sort, Parameter and On-screen Filter, and user customized messages. In a customized message, users can specify to send out multiple messages from one object on different trigger events and edit the message information as they want.
JReport provides the following built-in messages:
Filter
The built-in Filter message is sent out for asking the message receivers to filter themselves according to the filter condition defined in the message.
Sort
The built-in Sort message is sent out for asking the message receivers to sort themselves according to the sort condition defined in the message.
Parameter
The built-in Parameter message is sent out for asking the library components that contain the message receivers to re-run using the specified parameter values in the message. It has two sub types:
Automatic
This Parameter message type automatically contains all the parameters used in the current library component.
Customized
Using this Parameter message type, you can customize the parameter you want to include in the message.
On-screen Filter
The built-in On-screen Filter message is sent out for asking the message receivers to filter themselves according to the filter condition defined in the message.
Both built-in Filter messages and built-in On-screen Filter messages replace one another when the same field or category is involved. For example, when a data component receives two messages one after another: the first is a filter condition Country=USA and the second is City=London, the final filter condition applied to the data component will be City=London while Country=USA is removed. However when involving different fields or categories, built-in Filter messages still replace each other while built-in On-screen Filter messages can work with each other and with built-in Filter messages. For example, suppose that the first message is a filter condition Country=USA and the second is Sales Year=2019, as long as one of the two messages is a built-in On-screen Filter message, the final filter condition applied to the data component will be Sales Year=2019 and Country=USA. But if both are built-in Filter messages, the result will be Sales Year=2019. Choose the proper filter message type according to your needs.
A message consists of message ID, message name and message value set. A message ID is a natural number. JReport reserves the IDs from 1 to 1000, which are used for built-in messages, so you can only use IDs beyond 1000 to identify user defined messages. A message name is the name of a message. A message value set is a set of key-value pairs. Each key-value pair has one key and one value. A key or a value can be static or dynamic. A key is of String type, and each value has its own data type, which can be Number, Integer, String, Date, Time, Date Time, Boolean or Currency.
Sending messages
An object in a library component can send out different messages when different events occur on it to ask the message receivers to perform specific web actions defined in the messages.
The following objects in the library component body can be used as the trigger objects to send out messages: labels, data fields (DBFields, formula fields, parameter fields, summary fields), special fields, the category axis, legend and data markers of charts, markers and areas in geographic maps, parameter controls, and the Submit button of parameter form controls.
To send out a message:
Select the trigger object, right-click it and click Send Message > Filter/Sort/Parameter/On-screen Filter/Customize on the shortcut menu (for the Submit button of a parameter form control, only Parameter and Customize are available).
If Filter is selected, a built-in Filter message will be sent out when the Click event occurs on the object at runtime, which will ask the message receivers to filter themselves using the default filter condition Current Field = Current Value. You can edit the filter condition when specifying the message receivers if necessary.
If Sort is selected, a built-in Sort message will be sent out when the Click event occurs on the object at runtime, which will ask the message receivers to sort themselves using the default sort condition Current Field Ascending. You can edit the sort condition when specifying the message receivers.
If Parameter is selected, a built-in Parameter message of the Automatic type that contains all the parameter values in the current library component will be sent out when the Click event occurs on the object at runtime, which will ask the library components that contain the message receivers to re-run using the same parameter values. You can edit the parameter values when specifying the message receivers.
If On-screen Filter is selected, a built-in On-screen Filter message will be sent out when the Click event occurs on the object at runtime, which will ask the message receivers to filter themselves using the default filter condition Current Field = Current Value. You can edit the filter condition when specifying the message receivers if necessary.
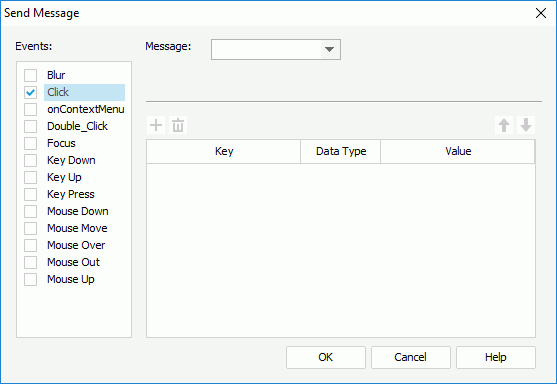
If Customize is selected, you can define the message by yourself in the Send Message dialog.
Check a trigger event in the Events box, then click on the name of the event to select it.
From the Message drop-down list, select the message type to be sent out when the selected event is triggered on the object at runtime.
Define the message as you want.
For the built-in message, you can edit the condition of how to perform the web action bound with the message in the Value column. To make the condition dynamic, select the values under the Dynamic Key node.
For a user defined message,
Specify the ID and Name of the message in the ID and Name text boxes. The ID should be a natural number beyond 1000.
Click to add a message key-value line.
In the Key column, specify a key from the drop-down list or select the <Input...> item from the list and then input a key into the text box.
In the Value column, specify the value of the key from the drop-down list or select <Input...> from the list and then input a value into the text box.
If you choose to input the value by yourself in the above step, you need to specify the data type of the value. If the value is selected from the Value drop-down list, the data type of the value is automatically displayed in the Data Type column and cannot be changed.
If necessary, add more key-value lines and specify the key, data type and value in each line.
To delete a message key-value line, select it and click . To adjust the order of the lines, click or .
Tip: You can also create a blank user defined message by only specifying the ID and name of the message.
Repeat the above steps to define other messages that will be sent out from the object on different events.
Click OK to accept the settings.
In addition to the above method, you can also use the Send Message web action to send out messages. To do this:
Do one of the following:
Right-click a data field, or a label in a table/crosstab, or a label, a basic web control, a parameter control or the Submit button of a parameter form control which is not in the library component's configuration panel, select Display Type from the shortcut menu. In the Display Type dialog, select a trigger event from the drop-down list in the Events column and click in the Actions column.
In the Behaviors tab of some chart format dialogs, select a trigger event from the drop-down list in the Events column and click in the Actions column.
While creating or editing a geographic map, in the Display screen of the map wizard, select a group level and click the Web Behaviors button. In the Web Behaviors dialog, select a trigger event from the drop-down list in the Events column, click in the Actions column and click in the Actions column.
In the dialog you are returned to, add more event lines and repeat the above steps to specify to send out more messages as you want.
Click OK to finish defining the messages to send out.
Receiving messages
The data components (tables, charts, crosstabs, KPIs and geographic maps) in a library component can receive messages that are sent out from the current library component or another one. When a data component receives a message at runtime, it will perform the web actions defined in the message, such as filtering, sorting itself using conditions specified in the message, running the current or another library component with predefined parameter values, changing its object properties, removing filter conditions, or drilling through data.
To make a data component receive messages and respond to corresponding web actions, take the following steps:
Right-click the data component and select Receive Message from the shortcut menu. The Receive Message dialog appears.
Click to add a message line.
Select the message you want the data component to receive from the Message ID column.
0001 - Filter
When the data component receives this message, it will filter itself based on the filter condition defined in the message.
0002 - Sort
When the data component receives this message, it will sort itself based on the sort condition defined in the message. Not available to KPI.
0003 - Parameter
When the data component receives this message, the library component that contains the data component will re-run with the parameter values defined in the message.
0004 - On-screen Filter
When the data component receives this message, it will filter itself based on the filter condition defined in the message.
If a built-in message is selected, the action the message will respond cannot be changed, but you can edit how the action will be performed as you want.
If a user define message is selected, you can specify the action the data component will respond when it receives the message and define how the action will be performed.
Repeat the above steps to add more messages to receive and define the actions to respond the messages.
To delete a message, select it and click . To adjust the display order of the messages in the message box, select a message and click or .
Upon finish, click OK to close the dialog.
The following details how to make a data component receive different messages.
To receive the built-in Filter message:
In the Receive Message dialog, select 0001 - Filter from the drop-down list of the Message ID column. The filter condition defined in the message will be automatically applied.
If you want to edit the filter condition, click in the Actions column and click that appears in the text box. The Filter dialog appears.
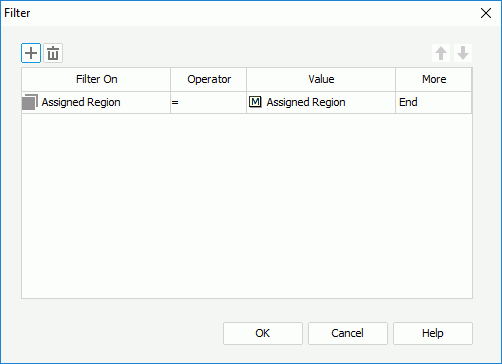
Specify the filter condition by selecting the field on which the filter will be based from the Filter On drop-down list, the operator to compose the condition from the Operator drop-down list and the value of how to filter the field from the Value drop-down list.
If necessary, click to add more filter conditions to filter other field values and specify the relationship between the conditions in the More column.
To delete a filter condition, select the condition and click . To adjust the order of the filter conditions, click or .
Click OK to finish defining the filter conditions.
To receive the built-in Sort message:
In the Receive Message dialog, select 0002 - Sort from the drop-down list of the Message ID column. The sort conditions defined in the message will be automatically applied.
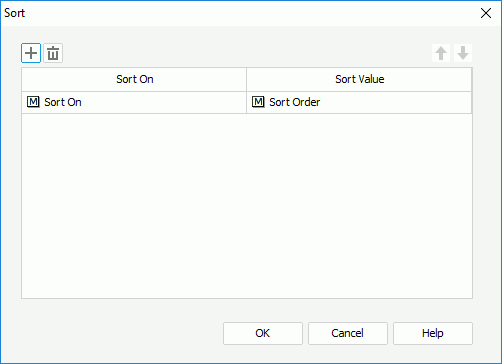
If you want to edit the sort condition, click in the Actions column and click that appears in the text box. The Sort dialog appears.
Specify the sort condition by selecting the field on which to sort the records from the Sort On drop-down list, and in which order to sort the records from the Sort Value drop-down list.
If necessary, click to add more sort conditions to sort other fields.
To delete a sort condition, select the condition and click . To adjust the order of the sort conditions, click or .
Click OK to finish defining the sort conditions.
To receive the built-in Parameter message:
In the Receive Message dialog, select 0003 - Parameter from the drop-down list of the Message ID column.
Choose a message type from the Message Info column: Automatic or Customized.
When Automatic is selected, all the parameter values specified in the sent message will be automatically applied. If you want to edit the parameters,
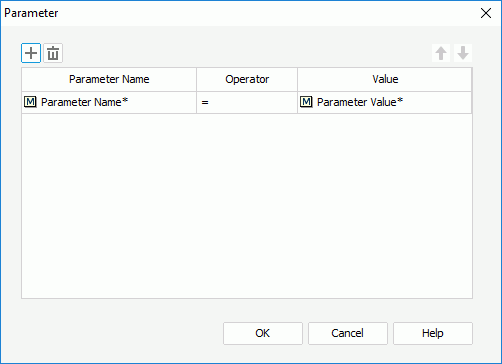
Click in the Actions column and click that appears in the text box. The Parameter dialog appears.
Specify the parameter and the value of the parameter from the Parameter Name and Value drop-down lists. The operator can only be =.
Parameter Name* in the Parameter Name drop-down list means that all the parameters defined in the message will be used to re-run the library component, and its corresponding value can only be Parameter Value* that represents all the parameter values.
If necessary, click to add more parameter lines to specify other parameter values. If you specify a parameter value more than once, the last setting takes effect.
To delete a parameter line, select it and click . To adjust the order of the parameters, click or .
Click OK to accept the settings. Then at runtime, when the data component receives the message, the library component which contains it will re-run, using all the predefined parameter values.
When Customized is selected, the parameter value defined in the sent message will be automatically applied. If you want to edit the parameter,
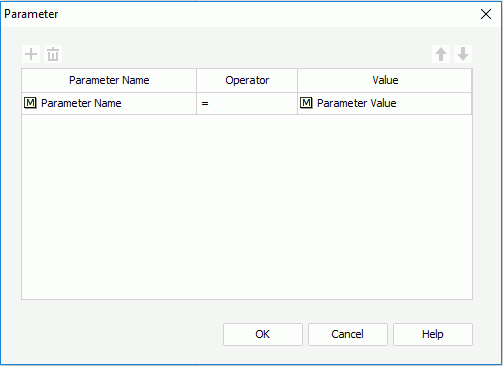
Click in the Actions column and click that appears in the text box to open the Parameter dialog.
Specify the parameter and the value of the parameter from the Parameter Name and Value drop-down lists. The operator can only be =.
Click OK to accept the settings. Then at runtime, when the data component receives the message, the library component which contains it will re-run, using the predefined parameter value.
To receive the built-in On-screen Filter message:
In the Receive Message dialog, select 0004 - On-screen Filter from the drop-down list of the Message ID column. The filter condition defined in the message will be automatically applied.
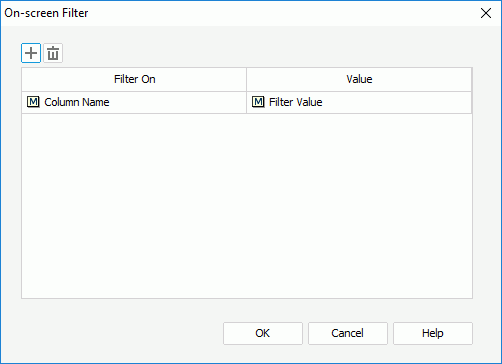
If you want to edit the filter condition, click in the Actions column and click that appears in the text box. The On-screen Filter dialog appears.
Specify the filter condition by selecting the field on which the filter will be based from the Filter On drop-down list, and the value of how to filter the field from the Value drop-down list.
If necessary, click to add more filter conditions to filter other field values.
To delete a filter condition, select the condition and click .
Click OK to finish defining the filter conditions.
To receive a user defined message and respond to the Filter web action:
The Filter web action enables you to filter the records of the data component when it receives the message.
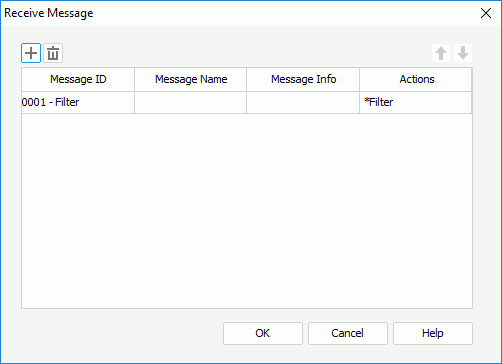
In the Receive Message dialog, input the ID and name of the user defined message in the Message ID column and Message Name column separately, then click in the Actions column and click that appears in the text box.
In the Web Action List dialog, select *Filter in the Action Name column and click OK.
To receive a user defined message and respond to the On-screen Filter web action:
The On-screen Filter web action enables you to filter the records of the data component when it receives the message.
In the Receive Message dialog, input the ID and name of the user defined message in the Message ID column and Message Name column separately, then click in the Actions column and click that appears in the text box.
In the Web Action List dialog, select *On-screen Filter in the Action Name column and click OK.
To receive a user defined message and respond to the Remove Filter web action:
The Remove Filter web action enables you to remove filters from the data component when it receives the message.
In the Receive Message dialog, input the ID and name of the user defined message in the Message ID column and Message Name column separately, then click in the Actions column and click that appears in the text box.
In the Web Action List dialog, select *Remove Filter in the Action Name column and click OK.
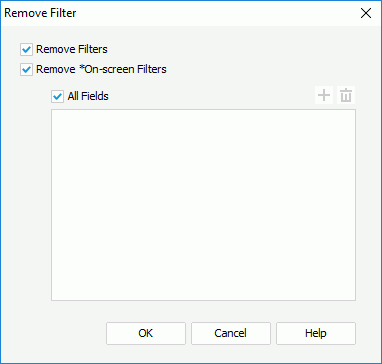
In the Remove Filter dialog, specify whether to remove filters (created using the Filter dialog, the Filter option on a field’s shortcut menu, and *Filter web action) and *on-screen filters (created by *On-screen Filter web action) from the data component. For *on-screen filters, you can also specify to remove filter conditions related to certain data fields. To do this, first uncheck the All Fields option, then click to add a row, click in the row and select a field from the drop-down list. You can add more fields if required. To remove an unwanted field, select it and click .
Click OK to accept the settings.
To receive a user defined message and respond to the Sort web action:
The Sort web action enables you to sort the records of the data component when it receives the message.
In the Receive Message dialog, input the ID and name of the user defined message in the Message ID column and Message Name column separately, then click in the Actions column and click that appears in the text box.
In the Web Action List dialog, select *Sort in the Action Name column and click OK.
To receive a user defined message and respond to the Parameter web action:
The Parameter web action enables you to run a library component, especially a library component with parameters using predefined parameter values, or re-run the current library component with predefined parameter values when the message is received.
In the Receive Message dialog, input the ID and name of the user defined message in the Message ID column and Message Name column separately, then click in the Actions column and click that appears in the text box.
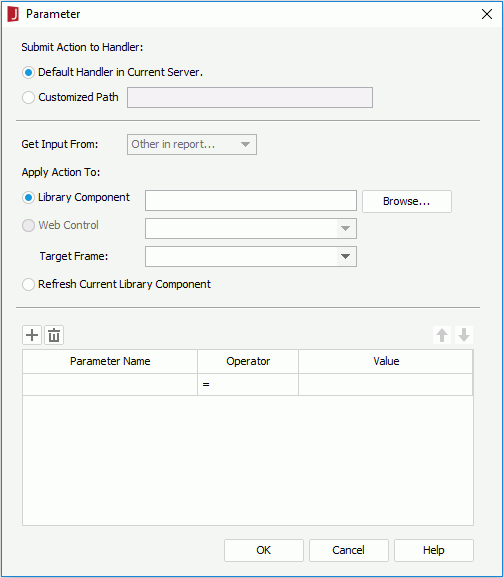
In the Web Action List dialog, select *Parameter in the Action Name column and click OK. The Parameter dialog appears.
Specify the handler which will receive the parameters of the web action. The handler may be the default one in the current server, or in another server specified by Customized Path.
Specifies whether to apply the action to run another library component or refresh the current. If you choose to run another library component, click the Browse button to specify the library component, then select the window or frame in which the library component will be opened from the Target Frame drop-down list.
If the specified library component contains parameters, the parameters will be automatically listed in the parameters box. Specify the value for each parameter. You can also click to add more parameter lines to specify other parameter values.
To delete a parameter line, select it and click . To adjust the order of the parameters, click or .
Click OK to accept the settings.
To receive a user defined message and respond to the Change Property web action:
The Change Property web action enables you to change properties of the data component when it receives the message.
In the Receive Message dialog, input the ID and name of the user defined message in the Message ID column and Message Name column separately, then click in the Actions column and click that appears in the text box.
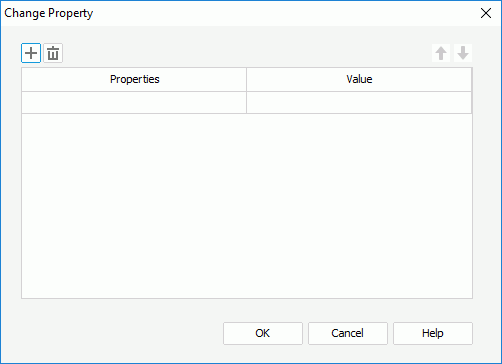
In the Web Action List dialog, select *Property in the Action Name column and click OK. The Change Property dialog appears.
Specify the property you want to change and the value for it respectively from the Properties and Value drop-down lists. Only the properties of the data component itself can be changed at runtime.
If necessary, click to add more property lines to change values of other properties.
To delete a property line, select it and click . To adjust the order of the properties, click or .
Click OK to accept the settings.
To receive a user defined message and respond to the Go Down web action:
The Go Down web action enables you to drill through data of the data component to the lower level when it receives the message.
In the Receive Message dialog, input the ID and name of the user defined message in the Message ID column and Message Name column separately, then click in the Actions column and click that appears in the text box.
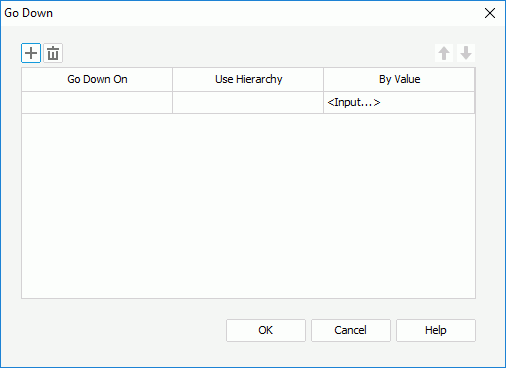
In the Web Action List dialog, select *Go Down and click OK. The Go Down dialog appears.
In the Go Down On column, specify the field on which the go-down action will be performed. For a geographic map, it is Current Layer and cannot be changed.
In the Use Hierarchy column, specify the hierarchy that the go-down action will be performed according to.
You can select a hierarchy in the business view or a web control in the library component which retrieves a hierarchy name at runtime. For a geographic map, the Built-in hierarchy is used and cannot be changed.
In the By Value column, input a value of the specified field to go down to the lower level with a filter condition SpecifiedField=TheValue. You can also use a web control to retrieve a value at runtime.
Click OK to accept the settings.
To receive a user defined message and respond to the Go Up web action:
The Go Up web action enables you to drill through data of the data component to the higher level when it receives the message.
In the Receive Message dialog, input the ID and name of the user defined message in the Message ID column and Message Name column separately, then click in the Actions column and click that appears in the text box.
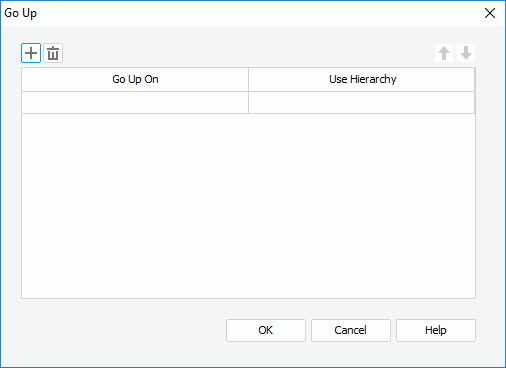
In the Web Action List dialog, select *Go Up and click OK. The Go Up dialog appears.
In the Go Up On column, specify the field on which the go-up action will be performed. For a geographic map, it is Current Layer and cannot be changed.
In the Use Hierarchy column, specify the hierarchy that the go-up action will be performed according to.
You can select a hierarchy in the business view or a web control in the library component which retrieves a hierarchy name at runtime. For a geographic map, the Built-in hierarchy is used and cannot be changed.
Click OK to accept the settings.
To receive a user defined message and respond to the Go To web action:
The Go To web action enables you to change a data field of the data component when it receives the message.
In the Receive Message dialog, input the ID and name of the user defined message in the Message ID column and Message Name column separately, then click in the Actions column and click that appears in the text box.
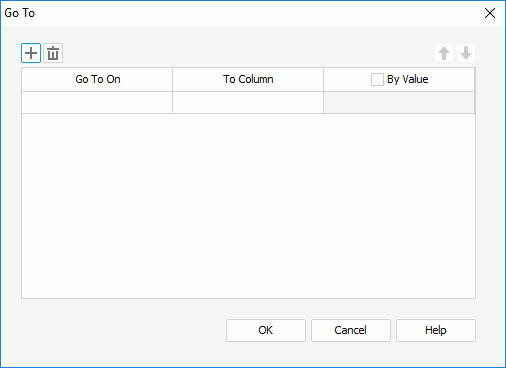
In the Web Action List dialog, select *Go To and click OK. The Go To dialog appears.
In the Go To On column, specify the field on which the go-to action will be performed.
In the To Column column, specify another field that the Go To On field will be converted to.
You can also use a web control in the library component to retrieve a field name at runtime.
In the By Value column, specify whether the go-to action will be performed by filtering a value of the Go To On field. If yes, check the By Value checkbox and then input a value or select a web control to retrieve a value at runtime. Skip this step if a crosstab aggregate field is selected in the Go To On column.
Click OK to accept the settings.
Note: In the drop-down lists for editing the conditions to respond a message, you may find that some items have the icon ahead of them and they are listed under the Message Key node. If you choose an item of this type, it means the item will not be used directly in a condition, instead, it will be mapped to a key in the message and JReport will find the value that is specified to the key from the message first and then use that value to compose the condition.
Example of delivering a message
This example demonstrates how to deliver a filter user defined message between two library components in order to synchronize the data components in them. It contains the following tasks:
Make sure SampleReports.cat is the currently open catalog file. If not click File > Open Catalog to open it from <install_root>\Demo\Reports\SampleReports.
Use the business view SaleStat in Data Source 1 to create two library components and save them as Component 1.lc and Component 2.lc.
For Component 1, create a chart which displays in the clustered bar 2-D chart type, shows Assigned Region on X-Axis and Total Actual as Bar Length. For Component 2, create a crosstab using Order ID and Assigned Region respectively as the row and column fields, and Total Actual as the summary field. Apply the style Commercial to both of them.
Task 2: Send out a filter user defined message from the chart
In this task, we will send a filter user defined message from the chart in Component 1 when the Click event occurs on any legend entry value.
Open Component 1.lc.
Double-click any bar of the chart. Then in the Fill tab of the Format Bar dialog, check Vary Colors by Color List to make the bar colors vary and then click OK.
Right-click the chart legend and click Send Message > Customize on the shortcut menu to bring out the Send Message dialog.
In the Events box, check Click as the trigger event, then click on the event to activate the message options on the right.
From the Message drop-down list, select User Defined, then input 1001 and Filter - Assigned Region as the message ID and name.
Click to add a message line.
Select the <Input> item from the drop-down list in the Key column and input Assigned Region in the text box.
Select Current Value from the drop-down list in the Value column. String is displayed automatically in the Data Type column.
The message is defined as follows:
Click OK to finish defining the message to be sent out.
Save the library component.
Task 3: Make the two data components receive the same message
In this task we will make the chart and crosstab in the two library components receive the same filter message to filter on the Assigned Region values when they receive the message sent out from a chart legend entry.
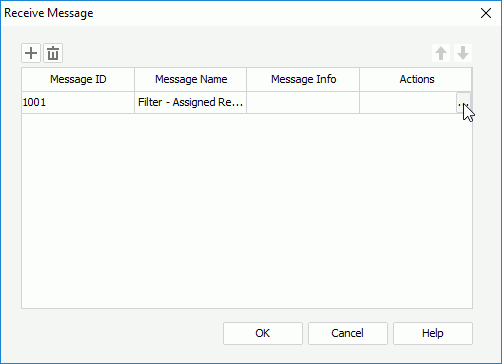
Right-click the chart platform and select Receive Message from the shortcut menu to display the Receive Message dialog.
Click to add a message line.
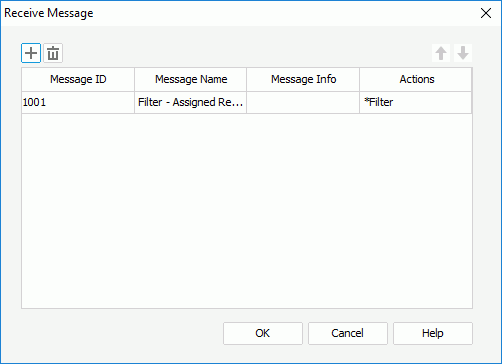
Select the <Input> item from the drop-down list in the Message ID column, then input 1001 in the text box.
Input Filter - Assigned Region in the text box of the Message Name column.
Click the blank text box in the Actions column, then click that appears.
In the Web Action List dialog, select *Filter and click OK to display the Filter dialog.
Select Assigned Region from the Filter On drop-down list, keep the default operator, then select <Input> under the Message Key node in the Value drop-down list and input Assigned Region in the text box.
Click OK to go back to the Receive Message dialog. The message Component 1 receives is defined as follows:
Click OK, then save the library component.
Open Component 2.lc.
Right-click the crosstab and select Receive Message from the shortcut menu.
In the Receive Message dialog, specify the message the crosstab is going to receive as shown above.
Save the library components.
Task 4: Publish the library components
Start JReport Server and publish the library components along with the catalog SampleReports.cat to the component library in JReport Server. For details about publishing resources from JReport Designer to JReport Server, see Publishing resources remotely.
Task 5: Deliver the message in a dashboard for data synchronization
Open the JReport Server console > Resources page, click New > Dashboard on the task bar. A blank dashboard is displayed in JDashboard.
In the Resources panel and browse to the folder where the two library components are published.
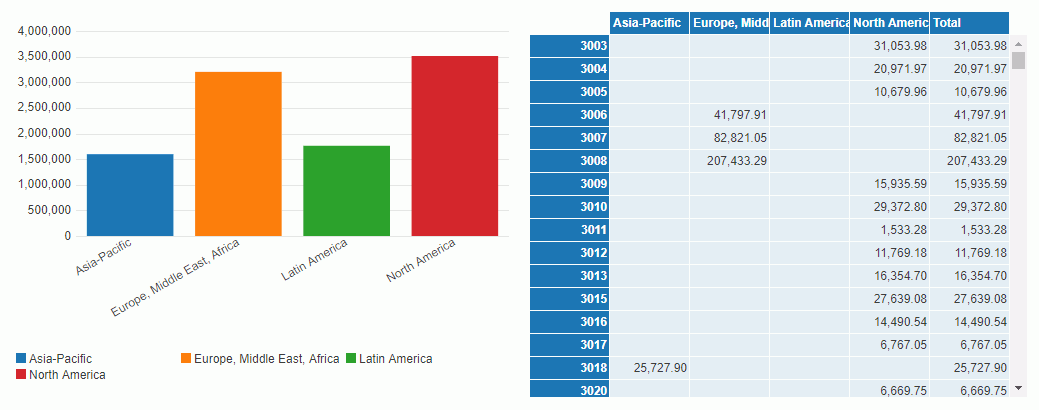
Drag and drop the two library components to the dashboard.
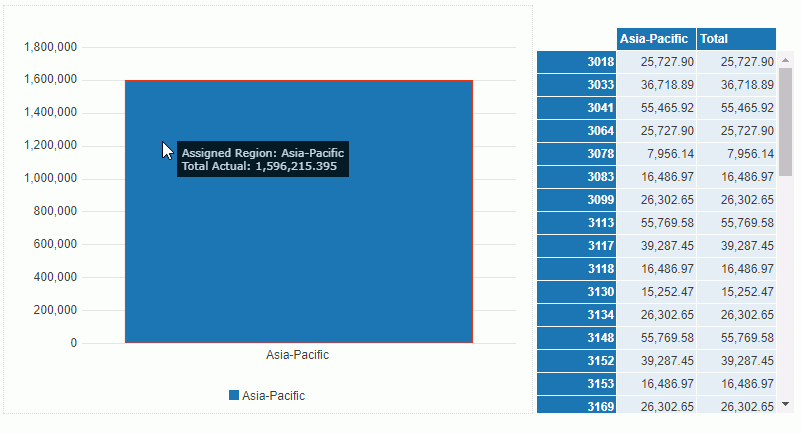
Click Asia-Pacific in the chart legend to send out the message. The chart and the crosstab are both filtered to show data in the Asia-Pacific region only.
Click the Clear Filters button on the toolbar to clear the filter in both components.
Click Europe, Middle East, Africa in the chart legend and the chart and crosstab are filtered based on this region now.
 Previous Page Next Page
 to add a message key-value line.
 . To adjust the order of the lines, click
  or
or  .
. in the Actions column.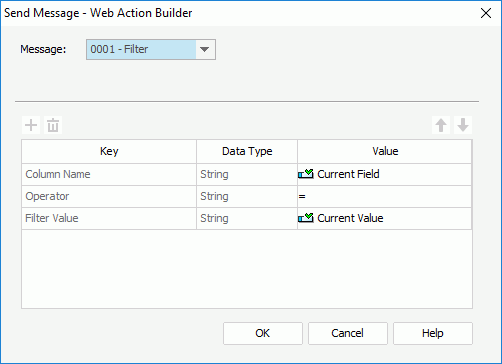

 ahead of them and they are listed under the Message Key node. If you choose an item of this type, it means the item will not be used directly in a condition, instead, it will be mapped to a key in the message and JReport will find the value that is specified to the key from the message first and then use that value to compose the condition.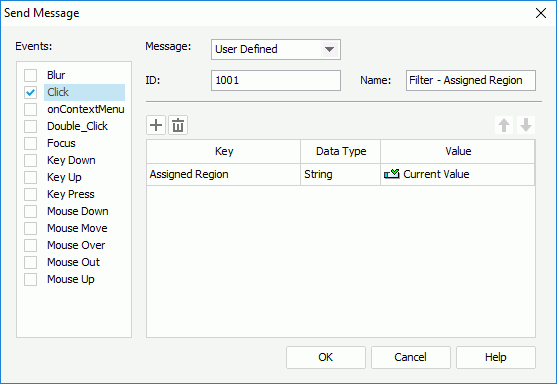
 on the toolbar to clear the filter in both components.